Sunday, April 14, 2013

Veg'n Chili - Cooking for Camping Series

veg'n chili
Cooking...???
So far most of this blog has been concentrated on raw living foods.
Sometimes though, it's just nice to cook some favorites.
Although some of my favorites aren't raw or living foods, I still think they qualify under the nutritious category :)
I love to cook big batches and freeze for ease when I go camping!! yippee!
One of my favorites is veg'n chili.  This recipe can be made vegan or lacto-vegetarian.
Use ALL organic ingredients when possible.

=I use a large crockpot-slow cooker and, of the two settings on my crockpot, I set on high.
=Then I put directly into the crockpot the following:
~2 cans black beans all contents, which means including the water the beans are in, and a small amount of can rinse water*
* can rinse water means that, after emptying the contents of the can, I add a small amount of water and swoosh this around to try and pick up any remaining can contents
~1 can spicy tomatoes** all contents, which means including juice, and small amount of can rinse water
** my favorite spicy tomatoes to use is Muir Glen fire roasted tomatoes with medium green chilies
~2 cups spaghetti sauce***
*** my favorite spaghetti sauce is 365 Organic brand pasta sauce classic
~1 can corn all contents, which means including the water the corn is in (prefer 2 cups fresh or frozen corn)

=Add spices to the crockpot blend and stir as follows:
~2 Tb chili powder (somewhat heaped)


jalapeno finely chopped
~1 Tb cumin powder (somewhat heaped)
~¼ tsp cayenne pepper powder
~1/8 tsp chipotle  chili pepper powder

=Chop and add directly to the crockpot blend the following:
~6 ounces portabella mushrooms, stem removed, chopped
~1/3 cup finely chopped mild/sweet onion
 ~1 beautiful red pepper**** (~ 1 cup) chopped

chopped red pepper
**** of note, only red peppers are ripe peppers, eat ripe :)
~1 and ¾ cup chopped carrot
~3 cups chopped zucchini
~1 cup chopped celery
~2 jalapeno peppers, seeds removed and finely chopped (3 if not using spicy tomatoes).

=If you would like to add cheese, I recommend the following organic valley cheeses.
These cheeses do not contain animal rennet.
~4 ounces of raw mild cheddar self-shredded
~4 ounces of mozzarella self-shredded

=It takes me about an hour and a quarter to chop and add all the veggies and grate the cheese.  This volume of ingredients fills my large crockpot up to the brim.

=Once that is complete, sit back and let the crockpot crock for another 1 hour, stirring every so often to get the flavors well mixed.
=Turn off crock-pot and let cool.

If you're going to freeze for later, divvy contents into storage containers for freezing.

Camping tip: When I go camping, I put the frozen food containers directly into coolers.  They thaw during the trip and I simply reheat at the campsite.  For the veg'n chili, I usually serve over rice.  I actually bring my rice cooker with me camping.  We camp at sites with electric.  I plug the rice cooker in and away we go.  Serve reheated (re-delicious'd) veg'n chili over rice.  Wa La! 

Omega 8006 Juicer made a cracking noise....

One day, a couple months or so ago, my nice expensive (but well worth the price) Omega 8006 Juicer made a sickening cracking noise...
I was afraid to take apart the juicing parts to see what I might find broken...
Luckily! Nothing had broken!  However, the auger looked like it had been stripped a bit on the hard plastic part (not the metal part that attaches to the machine turning mechanisms).  Still workable though!
I decided that I did not want my nice Omega Juicer breaking anytime soon and that I should be more careful how I used it... 
I had been putting the first round of vegetable pulp back into the juicer to be juiced a second time...
While at Hippocrates Health Institute in the wheatgrass juice bar, I had heard someone say that they put the pulp back into their juicer to get more juice out (and save money obviously...).
This seemed like a good idea to me...  So, when I returned home and started juicing, I also started putting vegetable pulp back into the juicer for what I thought would be the utmost in efficiency of juicing vegetables!
However, after the machine bogged down and made the sickening cracking noise...  I have since stopped putting vegetable pulp into the juicer for further juicing.  I figure it's not worth breaking the machine for a little extra juice from the pulp.
Since I stopped juicing vegetable pulp, my machine has been happily juicing away.  I'm also more careful about how much and size of vegetable junks I put into the machine.
The other thing the day of the sickening cracking noise made me realize was that, if I broke one of the parts, I wouldn't be able to juice until new parts arrived.  Never mind the cost if I broke the machine itself (beyond the exterior juicing parts)! 
That day I decided it would be a good idea to have a second set of parts....
Two plus months later, I finally ordered them!
I looked on www.amazon.com to see if I could find the parts for less than direct ordering from Omega but, I didn't find them.  I admit, I didn't look too far beyond that.  I decided to order directly through http://www.omegajuicers.com/
I ordered the following:
ItemSkuQtySubtotal
Drum Clear (8003/8004/8005/8006) PDRM821$24.00
Plunger (8003/8004/8005/8006) PPLUNG8351$6.00
Auger Black (8004/8006) PSCREW8461$60.00
Cleaning Brush Masticating Juicers PBRUSH82354$16.00
Drum Cap Black (8006) PDRUMCAP861$12.00
Juicing Screen (8003/8004/8005/8006) PSCRN835P1$26.00
Straining Sieve (8003/8004/8005/8006) PSIEVE82351$9.00
Juice Bowl (8004/8006) PBWLP846J1$8.00
Subtotal $161.00
Shipping & Handling $5.95
Grand Total (Excl.Tax) $166.95
Tax $9.66
Grand Total (Incl.Tax) $176.61
Omega 8006 parts - pulp bowl, juice bowl, straining sieve, plunger,
hopper, juicing screen, auger, drum cap, cleaning brush, drum
Obviously, the parts add up.  You don't necessarily need to get all of the above for a second set.  In my humble opinion, the most important items for a second set are the drum, auger, juicing screen, and maybe an extra straining sieve.  I also ordered a handful of the cleaning brushes since these do start to fizzle out when washing the juicer parts every day.
Perhaps ordering a second set may seem like a silly financial thing to do... after all, any part can be ordered for overnight delivery.
However, the other fantastic thing about having a second set of juicer parts is.....
I discovered, at least for me, that I don't have time to wash the juicer parts in the morning when I'm running around trying to get out the door; and then, when I get home, I don't feel like washing them before making a second round of juice for the afternoon.  This means that I normally don't end up doing the second round of juice, which is recommended by Hippocrates HI. 
I'm hoping that having a clean second set of juicing parts ready to go will help me follow through with afternoon juicing!!!!
In the scheme of things, the above cost is miniscule compared to doctor's bills.

Tuesday, February 19, 2013

Electromagnetic Radiation

One of the many things I learned at the Hippocrates Health Institute, besides going about eating living foods, is to be aware of radiation.
Different types of radiation are all around us.  We probably expose ourselves most frequently to electromagnetic radiation, which comes from our computers, TVs, phones, wireless routers, refrigerators, and even our alarm clocks!
One way to protect against these is to throw out all electronic devices! LOL :)
I know, not possible.
Another way is by using a device that somehow neutralizes these electromagnetic waves...
One such device is produced by Gia Wellness.
These devices are not cheap.
And, it's really difficult for many of us to believe and trust in things that we simply cannot see for ourselves.  But, there are devices that can detect electromagnetic radiation so, make no mistake about it, it's there, even if you can't see it!
The debate as to whether or not electromagnetic radiation impacts our health continues...
Some say yes, most definitely.  Others say no....
I have a hard time believing that all these electronic devices around us are not doing us harm.
While at Hippocrates, I did buy a 6-pack of the universal guards.  I put one on my laptop, one on my significant other's laptop, two on the TV, and two on the wireless router.  They last 3 years.
I wish I had gotten protectors for the cell phones too.  Since I don't have one on the cell phone, this is a big reason I try not to talk on the cell phone for too long.  Even with the protectors, it's still probably best to limit the amount of time you hold a cell phone anywhere next to your body.

Maybe I'm just gullible... 
But, I feel better having these protectors on the computers and wireless router that we use so much. 
I have also made it a point to unplug the wireless router when not in use.  There's no reason to have those waves going through your body all night long while you're sleeping.  I wish I could do something about the neighbor's wireless that I know makes it over to our house.  Oh well, at least we're taking steps with what we have control over. 


Sunday, February 17, 2013

Raw Vegan Hippo-style Eggless Egg Salad - Take 2....

I made another attempt at Hippocrates-style eggless egg salad yesterday...
I think I'm getting closer....
I had done some searching online for a raw vegan eggless egg salad recipes and found that a lot of recipes use cashews.  However, Hippocrates doesn't use cashews so I'm experimenting with other things...
The recipe I created yesterday is as follows:

Step 1:  Into a mason jar I put the following:
- one cup of sunflower seeds, which HAD NOT yet been soaked nor dehydrated
- 1/2 cup of pine nuts, which HAD previously been soaked and dehydrated
- 1/2 cup of almonds, which HAD previously been soaked and dehydrated
- sufficient distilled water to cover the seeds and nuts

Step 2: Let the seeds and nuts soak for about 2 hours
Raw Vegan Eggless Egg Salad
Step 3: Drain and rinse the soaked seeds and nuts and put into food processor

Step 4: Put the following additional ingredients into food processor with seeds and nuts
- One Tablespoon of deliciously infused Tuscan Herb Olive Oil (organic cold pressed).  Use whatever olive oil you like to use
- One teaspoon of kelp powder.  I use kelp powder to keep salt low.  Feel free to use Braggs Aminos or whatever you like.
- One teaspoon of mustard powder
- One teaspoon of turmeric
- A couple small dashes of ground coriander seed
- A couple small dashes of cayenne powder (if you like a little spice)
- One cup of cauliflower florets (I only used florets, not stem).

Step 5: Process until desired texture.

If I was serving this "as is," I would also stir in some chopped celery to the processed mixture.  I was serving this with chopped celery burrito-style so I didn't pre-mix any celery.

Next round I will probably add some garlic powder or fresh garlic clove and perhaps a tablespoon of sweet onion.

Whether or not this tastes like egg salad...  this recipe is tasty "as is" presented above.

I should also add that that recipe as presented above makes a few cups of eggless egg salad.  So, you may wish to adjust the amounts if you don't want as much or you need more...

Albino Sunflower Sprout!

albino sunflower sprout!
Although the past couple weeks have been less than perfect with respect to eating under the Hippocrates method...
The sprouting continues! 
And yesterday... I found the coolest thing !  An...

ALBINO SUNFLOWER SPROUT!

I wish I had found it before I cut it because it would have been neat to watch this thing grow!

If you're sprouting, keep your eyes out for nature surprises!

Tuesday, February 5, 2013

Other sprouting ideas

calendar for tracking sprouting
All this sprouting can get pretty busy and crazy!
Once multiple sets of trays are going, it's difficult to keep track of when what was planted and when covers need to be removed.
So, I put up a new calendar in the sprout area and started noting when things were done and when things need to be done.  I just love this "faerie homes" calendar.  So fitting.
Since I need to be starting sprouts more often than just once a week on the weekends...  I've decided to start splitting things up a little bit so that the work is spread out.  I'm also trying to reduce the amount of time sprouting tasks take in the mornings before I head out of the house.  As it is I'm up at 5:30 a.m. and out the door at 6:45.  The more soil trays I have to water in the morning the earlier I may have to rise... 
Spending this much time at home in the mornings is also a definite "life change" since attending Hippocrates!  I use to get up and be out the door in maybe 15-20 minutes, stopping at dunkin donuts or Starbucks for breakfast...  bad habits!!!  Now I wake up, drink water and take some supplements (which will only be short-term), make and drink wheatgrass juice, shower & lymph massage combo, water sprouts and do any other sprout task in cue, make green drink and finish making/packing lunch.  Head out the door with green drink in hand for the long drive...  but, I digress from sprouting!!!
sunflower soaking and
wheatgrass and pea ready to be soaked on following days
SO... Sprouts need to be soaked, rinsed, and then planted if soil sprouts.  The rinsing/watering is suppose to be done three times per day...
To keep things in the morning minimal, I put the desired amount of seeds in a jar the night before.  Then the next morning all I need to do is fill with water.  That late afternoon or evening the seeds have soaked for at least 8 hours and it's time to start the rinsing phase, which lasts for about one day.  Following this timing, the seeds get planted the next night.
I've also decided to off-set and do only one type of seed per day.  I set some of the jars up ahead of time and use sticky notes to remind myself which mornings they need to be filled with water to start soaking.

Status of Wheatgrass...

wheatgrass with mold
So, I got a great first-time harvests of pea sprouts and sunflower sprouts this past weekend but, the wheatgrass...  well, it's still growing...  
I have been harvesting wheatgrass the last two days for morning wheatgrass juice.  I'm not going to get as much out of this 10x20 tray as I probably should be getting.  Hippocrates Health Institute (HHI) "sprouting Brian's" notes indicate a 10x20 tray should produce 20 ounces of wheatgrass juice.  I'm probably only going to get maybe 10 ounces.  One of the reasons is because I'm cutting the grass fairly high up from the soil, because... my wheatgrass has mold!   At least that's what I think it is.... Bummer!!!  In reading my notes from sprouting Brian's 'sprouting is easy' class at HHI, the notes indicate that 90 percent of the time, mold issues result from lack of air movement.  So luckily I live in Florida! where just about every room in every house has a ceiling fan! LOL!  I don't like having electrical things running all the time but, I'm going to see if running the ceiling fan on low works for minimizing and hopefully eliminating mold issues in the wheatgrass!!  To date, none of the sunflower or pea sprouts have had mold that I've noticed...  The wheatgrass gets pretty thick though.  "Sprouting Brian" noted that, the other 10 percent of the time, mold issues may be from too high temperature or too high humidity.  Brian indicated that sprouts like the temperature to be between 65 and 75 degrees Fahrenheit and for the humidity to be below 50 percent.  Since starting sprouting, the air-conditioner is set at 74.  Normally I would let the house get up to 80, so this is definitely a "life change" from before attending Hippocrates!  LOL!
second shoot
I am kind of wondering if I didn't water too much in the beginning and cause locally high humidity within the sprout tray...  Or, maybe because I was reusing rinse water from smaller leafy green sprouts to water the bigger sprouts there was, perhaps, contamination... 
For my next round of sprouts I'm "simply" using a 32 ounce "Professional Sprayer," triple volume high output adjustable nozzle (see photo).  I wish I could remember where I bought this... I bought it some time ago...  Maybe Target or Wal-Mart...  I'm not sure.  It's a great sprayer.  I fill it up (~32 ounces) and spray the small leafy sprouts in the Easy Sprouters (broccoli, clover, fenugreek, garlic) and then I spray the soils trays of sunflower, pea shoots, and wheatgrass.  Currently I have 4 soil trays of sprouts plus the older wheatgrass that is partially harvested.  Spraying all these sprouts, plus a little on the mung bean sprouts, uses up the 32 ounces.  I'm using a lot less water using the sprayer.  It remains to be seen if the water supply is sufficient to the sprouts.  I'm trying to use minimal water since I'm currently watering with distilled water purchased in one-gallon containers from grocery store.  Not exactly a cheap way to water...
I've continued to let the wheatgrass grow while I harvest this week because I haven't noticed but one blade that has had a second shoot (see photo).  According to "sprouting Brian," it's best to harvest as soon as the second shoot emerges, before the wheatgrass starts to get bitter.  I have to admit, the wheatgrass juice I've been juicing from my freshly cut wheatgrass has very little, if any, bitterness.  Quite smooth, in fact.

Sunday, February 3, 2013

Soil Sprouting - Take 2! Lessons Learned :)

start soaking
During the first round of soil sprouting wheatgrass, pea shoots, and sunflower seeds, I learned that soaking 2 cups of pea shoot seeds quickly fills up a one quart jar!  I also learned that it's not all that easy to find the next size up, 1/2 gallon, jars.  I found some online www.amazon.com
When they arrived, I started soaking round two of soil sprouting seeds!

finish soaking
The top photo on the right shows three 1/2 gallon jars next to a one quart jar.  The top photo is the start of soaking 2 cups each of seeds and water filled to 4 cup mark.  The next photo down is after 8+ hours of soaking.  Going from left to right, the sunflower seeds are still floating!  I tried stirring and mixing but just can't get them to sink.  The next smaller quart jar has only 1/2 cup of mung bean seeds and 2 cups water.  The next larger jar is wheatgrass and the furthest right jar is pea shoot seeds.  I can see that next time the pea shoots need more water than the 4 cup mark.  Next time I'll go up to the 5 cup mark.  The HUGE lesson I learned about mung bean sprouts is that a little goes a long way!  I ended up throwing out the first batch.  The volume of growth got out of hand and air flow was poor (see previous blog Mung bean sproutings are taking over!).  The sprouts started going bad.  Oh well, live and learn!!!


seeds onto soil
During the first round of soil sprouting I went a little too long on soaking and rinsing times...  The seeds had really started sprouting before I got them onto the soil and they were pretty tangled.
So, for this second round, I soaked the seeds 11 hours and then kept them in the rinse phase for 17 hours.

The trays are now up on the shelving unit with weighted cover on sunflower sprouts and unweighted cover on pea and wheatgrass for the next 3 days...

Stay tuned for more lessons learned and organization techniques to come in subsequent blogs...


Harvest Day!!!

pea sprouts
pea sprouts harvest
Yesterday was harvest day for sunflower and pea sprouts! 

The pea sprouts were getting huge and the sunflower sprouts ready too. 


I remember hearing someone say, perhaps it was Brian Clement himself, that a sunflower sprout up to 7 days is a complete protein but, beyond 7 days it becomes a vegetable.  So, since I planted these sprouts last Saturday, I figured it was definitely time, perhaps even a little past time, to harvest. 

sunflower sprouts
sunflower sprouts harvested
Before harvesting the sunflower sprouts, I took the time to remove all the seed covers that had not yet fallen off.  When rushing around to make green juice in the morning before heading out for the day, it's nice to have the seed covers removed from the sprouts!  May as well do this task when I'm not in a rush! 

From the 10x20 tray of sunflower sprouts I harvested 2 pounds of sunflower sprouts!!! 
From the 10x20 tray of pea sprouts I harvested 2 pounds of pea sprouts!!!
It's difficult to express how much I enjoy this process.  It's amazing.  Simply wondrous.
What a glorious day :)

The wheatgrass is almost ready to harvest...
And, I've learned some lessons...
Some organizational ideas I've come up with to help make this process a little easier on myself will be included in a subsequent blog very soon...

Saturday, February 2, 2013

Disappointed with Got Sprouts? and Squirrel...

So, earlier this week I had placed another wheatgrass and pea sprout order with www.gotsprouts.com
Unfortunately, I placed it on Saturday without thinking ahead that I would run out of sprouts on Sunday when there's no UPS delivery...  Which meant, I didn't have any wheatgrass or pea sprouts on Sunday and not until Monday evening when UPS arrived. 
Now Monday was not that hot of a day for Florida, since it is winter time...  However, my sprouts arrived on the verge of being hot.  When I submitted the request to Got Sprouts?, I requested an additional cold pack be placed in the package because UPS doesn't get to my house until the end of the day (package sitting in their non-air-conditioned truck all day long...) and my first order of sprouts arrived warm...  So, when my second order arrived on Monday late afternoon with no additional cold packs and the sprouts on the verge of hot...  I decided that was it for Got Sprouts?  If I need sprouts I'll be searching for another source.  I can't wait to get my own sprouts up to speed to keep up with my demand!!!
I was going to order seeds from Got Sprouts? but, since they didn't honor my request of additional cold-pack and my sprouts arrived hot, call me impatient...  The next afternoon I called Hippocrates Store and ordered seeds from them.  Since I called late afternoon, HHI-store processed the order the next day and I had 40 pounds of seeds the day after that!  Yup, 40 pounds of seeds... 10 lbs wheatgrass, 10 lbs sunflower, 10 lbs pea shoots, and 10 lbs mung bean seeds. 
On Thursday evening, I started soaking my second round of seeds for soil sprouting.  Friday morning I dumped the soak water and started the rinsing phase.
Friday afternoon I was working in the kitchen and happened to be at the sink when I felt a presence...  I looked out the window and saw a squirrel starring at me!  He saw me see him but he kept on looking very intently into the window.
My significant other came home a little while later and the squirrel was still hanging around the back of the house.  I pointed the squirrel out and told my significant other how the squirrel was starring at me...  He said, "well, you've got the screen door and windows open and he probably smells the seeds!"  He also noted that, for whatever reason, we hardly ever see squirrels around here but the moment you order tons of seeds and have the windows open, the squirrel shows up.  Animals have a good sense of smell you know...   You can bet that Peppermint Patty Cat was getting excited watching the squirrel :)  But, she's an indoor cat so the squirrels and bunnies and birds are safe.

Friday, February 1, 2013

Raw Pizza - Part 2

A couple/few days ago I started to make Raw Pizza (vegan).  For part 1, see Raw Pizza - Part 1 blog entry.  That entry includes preparation of the crust.
Last night I was planning to do part 2 but....  I was just too tired.  So, I took the crust out of the dehydrator and put it into the fridge for finishing tonight!
When I got home this afternoon, I took the crust out of the fridge and put it back into the dehydrator, set on 115 degrees Fahrenheit, and started preparing the raw red pepper marinara and nut cheese for the pizza.

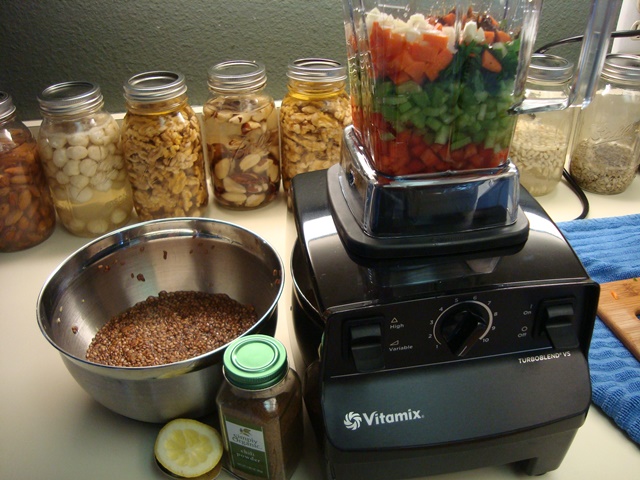
ingredients for raw red pepper marinara
The Hippocrates kitchen recipe for the Raw Red Pepper Marinara is as follows:
4 chopped red bell peppers
1/2 red onion, roughly chopped
1 clove garlic
1 Tablespoon Frontier Pizza Seasoning
1/4 cup extra virgin olive oil
1 teaspoon fresh lemon juice
Fresh Oregano, to taste
Fresh Thyme, to taste
Braggs Aminos, Dulse, Or Kelp Granules, to taste
Liquid Stevia Extract, to taste

1. In food processore, combine all ingredients.
2. Blend to a smooth consistency.
3. Season to taste.

Most of the Hippocrates recipes yield large amounts and I need to halve them at a minimum.  I had already halved the crust recipe so I simply halved the raw red pepper marinara recipe as well with the following modifications....
I used about 1 Tablespoon of sweet onion instead of the red onion.
I didn't have any of the fresh herbs in the recipe so I used 1 teaspoon of basil and about 1/2 teaspoon each of oregano and thyme.
I used 1 teaspoon of kelp powder.
I did not use any Braggs, dulse, nor Stevia.
I used Organic Tuscan herb infused olive oil from Bella Balsamic and Pressed Olive.  Delicious!  I'm fortunate there is a store within an hour's drive that carries these fabulous oils.
I also added a dash of cayenne, because I love it!
The consistency of the pepper sauce was looking pretty wet and runny so...  I also added 1 teaspoon of psyllium husk powder to thicken it up.  I set the sauce aside to thicken as I made the nut cheese...


putting nut cheese onto raw pizza crust
The Hippocrates kitchen recipe for the Nut Cheese is as follows:
2 cups macadamia nuts, soaked & rinsed
1 cup pine nuts, soaked and rinsed
2 stalks celery
1/4 yellow (or better yet, Vidalia) onion
1 Tablespoon Kelp powder
pinch of Cayenne
2 Tablespoons Oregano
2 ounces lemon juice
2 cloves garlic
1/2 cup water

1. Blend in a high speed blender, stirring vigorously.

I halved the nut cheese recipe as well with the following modifications....
I'm not sure if they meant to use the macadamia and pine nuts straight out of soaking and rinsing without dehydrating but...  I have found it near impossible to do that much planning such that the nuts are done soaking just at the time that I'm ready to use them for a recipe...  So, I used nuts that were soaked, rinsed, AND dehydrated.  It's a lot easier to have the nuts already soaked, rinsed, dehydrated, and ready to go in the cupboard.
I didn't have yellow onion, nor Vidalia onion.  I wish I had Vidalia onion. Those onions are simply superb.  I used about one Tablespoon sweet onion.
spooning raw red pepper marinara onto nut cheese on crust

Although I halved the rest of the recipe, I did use two small cloves of garlic, because it's Friday night and I don't have to worry about being garlicy tomorrow!
I ended up using close to the 1/2 cup of water.  I found 1/4 cup of water didn't work too well...  Maybe I needed more water because the nuts were dehydrated...  Maybe I needed more water because this halved small batch just wasn't mixing well in the Vitamix...
One problem with making small batches of the nut cheeses in a large high speed blender, like the Vitamix, is that it is tougher to get them blended properly.  It's also a tad difficult for a short person to "Blend in a high speed blender, stirring vigorously."  Once I put my Vitamix on the countertop, the top of the blending container is already at my shoulder height... and that's before I put the 2-inch cover on the container and the Vitamix stirrer into the cover.  My arm is arching up and over trying to "stir vigorously" and getting very sore in the process.  So, I decided that wasn't going to work for me.  What I did was toss the cover and Vitamix stirrer and gradually bring the speed up on the blender until it sounded like an air pocked was forming.  Then I turned it off, used a spatula to move the ingredients back down, and repeated this process until the nut cheese became a consistency that looked fairly well blended.

zucchini and carrot added to top of pizza
Also of note for this recipe, Chef Ken from Hippocrates pointed out during the Kitchen Techniques Class that the recipe uses oregano in place of nutritional yeast for helping bring out a "cheezy" flavor.  Hippocrates does not use nutritional yeast because of its yeast characteristic.

With the raw red pepper marinara and nut cheese complete, I decided to spread the nut cheese onto the crust first since the nut cheese is a much thicker consistency than the pepper sauce.  The red pepper sauce was then spooned and spread over the nut cheese.  To finish, I sliced some zucchini and shred some carrot for toppings.  I placed the pizza into the dehydrator, set to about 120 degrees Fahrenheit to start and turned down to 115 after about 30 minutes.

pizza after a little less than 2 hours in dehydrator
The initial crust recipe indicates that the pizza crust is to be topped and dehydrated overnight again!  Well, I just couldn't wait that long to taste this pizza and, I figure, raw is raw, and take it out after about 1 hour 45 minutes to feast!  Along with a large salad with lots of sprouts, of course :)  It was delicious!  After eating one slice each, the pizza is now back in the dehydrator for overnight dehydrating and lunch tomorrow!  This raw pizza is very heavy and one piece is really about all that is necessary, especially with a nice big salad.  I found this raw pizza quite satisfying.  Although it doesn't totally squelch the thoughts of a dairy cheesy salty doughy pizza, it does a pretty darn good job.  Yum!  Great job to all the Hippocrates chefs that helped create this deliciousness!

Of note, although I had already halved the recipes, I still had lots left over of both the marinara and nut cheese.  These will be lovingly used to make some kind of nut burrito probably tomorrow night :) 
Next time I will probably make the crust thinner...  This 9 inch round of crust is about 1/4-inch thick, which is pretty thick.  Next time I'll shoot for 1/8 inch if possible, which will make for an even larger pizza and toppings used further...  It's a lot of pizza though and I don't like to keep things more than a few days in the fridge so perhaps I will need to cut the recipe down to 1/3 instead of 1/2...

Peppermint Patty Cat in the Kitchen

Peppermint Patty Cat about to chomp wheatgrass
I believe the story goes that Ann Wigmore, founder of the Hippocrates Health Institute (originally in Boston), loved cats!  And, she used them to determine which wheatgrass was best for healing.  She would grow different kinds of wheatgrass and see which ones the cats preferred!  I had no idea there were so many different kinds of wheatgrass!  I have since found out when surfing the internet searching for "hard red winter wheat" seeds, which is the type of wheatgrass that HHI currently uses.
I have found that many people are surprised that carnivorous cats would like greenery.
Most cat owners are aware but, even they are surprised when I tell them I regularly feed my cat organic baby mashed peas... and she, Ms. Peppermint Patty, loves them!  Cries for them, in fact.
She also meows at the smell of greenery when it comes into the house, like bundles of celery and carrots with leafy green tops.  With all the new sprouting going on in the house she's always about sniffing the air.
Now that the wheatgrass has really started to grow she's taken to standing beneath the shelf, looking up forlornly, and meowing.  Sitting up on her haunches or pacing to and fro looking for a way to hop up into the carpet of green.
So, I clip her some wheatgrass, put in one of her bowls, and she happily munches away.

Flax Cracker Snack

flax cracker snack prior to 20-30 min in dehydrator
Last night I got home and didn't have the energy to finish the pizza... So, I took it out of the dehydrator and put it in a Debbie Meyer's Green Bag and put it in the fridge.
Then I came up with the idea of making a flax cracker snack!
I took some of the flax crackers that I had made the other day (see flax cracker blog) and put them on a dehydrator tray.  I then sliced zucchini and put that on top of the flax cracker.  Sliced thin some carrot on top of the zucchini.  Then dolloped with some nut cheese I had made the night before.  I put these into the dehydrator on 115 degrees Fahrenheit while I made salad.  Out of the dehydrator these quick and easy (once the flax crackers are already made) flax cracker appetizers or snacks are delicious!
I think the nut cheese recipe I used the night before was as follows:
1 cup macadamia nuts (soaked, rinsed, dehydrated)
1/2 cup pine nuts (soaked, rinsed, dehydrated)
1 Tablespoon sweet onion
1 teaspoon kelp powder
dash cayenne
1 ounce lemon juice
1 Tablespoon oregano
water

1. Blend all ingredients in high speed blender.

I can't believe I've already forgotten how I made the nut cheese last night...  I always think I'm going to remember the little twists and turns but, no...  I think I used the above, it's a slightly modified version of the nut cheese recipe used for the RAW PIZZA!!!

Wednesday, January 30, 2013

Raw Pizza - Part 1

dehydrating soaked seeds
Making raw vegan pizza is not a simple task...  There are many many tasks spread over a number of days...
For the crust, sunflower seeds and pumpkin seeds need to be soaked and dehydrated.  Almond meal also needs to be prepared.
In preparation for the nut cheese, macadamia nuts and pine nuts need to be soaked and dehydrated.
So, I went about soaking a bunch of different things so as to use the dehydrator efficiently.  I dehydrated all these seeds and nuts a couple days ago when I made the flax crackers too!
After all the soaking and dehydrating is done, it is time to dig in to the crust.
soaking nuts for raw pizza and much more....

HHI Raw Pizza Crust Recipe as follows:
1 cup sunflower seeds (soaked and dehydrated)
1 cup almond meal
1 cup pumpkin seeds (soaked and dehydrated)
3/4 cup flax seeds, ground
1 clove garlic
2 teaspoons psyllium husks powder
3 teaspoons herbs de provence
5 drops liquid stevia extract (optional)
2 Tablespoons Braggs Aminos (also optional)
1 2/3 cup water

1. In food processor, combine all the nuts/seeds, psyllium, and dried herbs.
2. Process until a fine crumble is achieved.
processing pizza dough
3. Add the remaining ingredients and process well.  The mixture will come together as a slightly sticky dough.  During the Kitchen Techniques Class at HHI, Chef Ken said this part of the mixing could also be done by hand in a bowl..
4. By hand, take the mixture and form it into a large ball.  If necessary, this can be put in fridge for next day.
5. Using a paraflex sheet or unbleached parchment paper, place the dough ball on a dehydrator tray. 
6. Smooth out to form a large round, leaving the edges raised as the cruts.
pizza dough ready for dehydrator
7. Dehydrate overnight.
8. Flip and dehydrate for the remainder of the day. Removing paraflex.
9. Sauce and top with your choice of toppings and dehydrate again overnight.


 I pretty much followed the recipe as above with the following exceptions.
- I halved the recipe.
- I didn't have Herbs De Provence so I used "Italian Herb" mixture instead.
- I used 1 teaspoon Braggs Liquid Aminos.
- I forgot to add the garlic clove...
- I used pre-packaged organic coarsely ground flax seed.  But, one of these days I will grind my own in the vitamix.

Stay tuned for Raw Pizza - Part 2...

Mung Bean Sprouts are taking over!!!

~4 cups mung bean sprouts (green)
I'm completely amazed by the mung bean sprouts!  They keep expanding and growing and growing and growing....
I previously blogged about the mung bean sprouts
At that time I was thinking I probably should have done half the amount I had started...
And now I'm thinking I should have done only one quarter what I started!!! 
I originally started soaking 2 cups dry mung bean sprout seeds.  Those 2 cups quickly expanded into 4 cups of soaked seeds...
Three days ago, I split the 4 cups of soaked seeds into two pitchers.
And now I'm pretty sure that I should have only started with 1/2 cup of dry mung beans!  I now have about 8 to 10 cups of sprouts and they're not done growing yet!!!!  I love mung bean sprouts but I don't know what I'm going to do with all of these when they're done!

mung bean sprouts into 2 pitchers
The mung bean sprouts are about to toss off the top weighted pitcher!!!

mung bean sprouts about to toss off top pitcher, other set in bowl
Currently they are now in a 3-pitcher set-up.  The bottom pitcher is the solid catch-water pitcher.  The middle pitcher has holes drilled into the bottom so that rinse water drains into the bottom solid pitcher.  Thank you wonderful significant other for handy drill work!  The middle pitcher has the sprouts.  On top of the sprouts and middle pitcher is the top pitcher, which is solid and which has a mason jar full of water to apply weight to the sprouts.  The sprouts are now getting so full that I doubt the air flow is ideal.  I'm fairly confident it is less than ideal!  Next round, I'm only going to soak 1/2 cup of mung bean sprouts at one time...

I'm not sure what to do at this point as they're getting ready to outgrow the only containers I have ready for them!  I bought out the pitchers at Wal-Mart and I'm not sure they've restocked or if they will restock.  I may have to look for different pitchers!!  I'm afraid I might go to bed tonight and wake up tomorrow morning with a kitchen full of mung bean sprouts!!  Take over of the sprouts!!!!


Monday, January 28, 2013

Flax Crackers

flax seed crackers, yum :)
My first attempt at flax crackers...
HHI recipe given as follows:
5 red peppers
1/2 red onion
3 cloves garlic
3 Tablespoons chili powder
2 1/2 cup flax seed
1 cup ground flax seed
3 oz. fresh lemon juice
3 stalks celery
1 teaspoon garlic powder
1 pinch cayenne powder
5 1/2 cups water


1. Soak flax seed in water for at least 3 hours and set aside.
2. Blend remaining ingredients and add to soaked flax seds.
3. Mix in ground flax seed.
4. Spread out on a paraflex sheet.
5. Score to desired size of crackers.
6. Dehydrate overnight then peel off the paraflex sheet.
7. Dehydrate again until the crackers are crispy.

My dehydrator was already planned to be fairly full with trays of different nuts I had soaked for 24 hours so I used a smaller recipe than the above, with two additions, as follows:
flax seed ingredients

~ one cup of chopped red peppers
~ one cup of chopped carrot
~ one cup of chopped celery
~ 1/3 cup of chopped parsley
~ one Tablespoon chopped sweet onion
1 clove of garlic
~ one ounce of fresh lemon juice
1 cup flax seed (pre soak)
~1/3 cup coarsely ground flax seed (no soaking)
1 Tablespoon chili powder
no garlic powder (didn't have any)
1 small dash cayenne pepper
1 cup water

I'm positive I ended up soaking the flax seeds for more than three hours...  When I returned for a beautiful bike ride in the Florida sunny weather, I went to rinse the soaked flax seeds and found a gelatinous goop (see photo above).  Not sure if this is normal result of soaking flax seeds...?
gelatinous soaked flax seeds
soaked flax seeds
I then made the mistake of putting the gelatinous goopy flax seeds into a strainer with holes larger than the seeds!  So, I lost some of the seeds before transferring the goop back into soaking jar.  I then proceeded to try and rinse the seeds using a small mesh stainless steel strainer.  The goopy slimy feeling on the seeds never did go away and I couldn't seem to get all the gelatinous fluids to leave so I think that may be why my flax concoction was a little runny...  Next time, if the seeds are that goopy, I'll use less water.

flax cracker mix pre-dehydration
After getting everything together, I spread the mixture out onto two Excaliber paraflex sheets.  About 3 cups of the mixture onto one sheet and about 2 cups onto the second sheet.  As I mentioned, my mixture came out a bit runny so it wasn't really possible to "score" to desired size crackers.  So, mine dried in one huge cracker! 
I pre-heated dehydrator at 120 degrees Fahrenheit just briefly before putting the flax mixture in.  I kept the dehydrator on 120 inadvertently for probably a hour or so...  Then, when I was walking by and remembered...  I turned down to 115 degrees Fahrenheit.  Time for a timer!
I dehydrated overnight, took out paraflex and flipped the large flax crackers and continued to dehydrate while I was away for the day.  Got home late afternoon and the crackers were pretty crispy.  Since they hadn't been scored, I simply broke them into pieces.  Next time less water so I can maybe make them a little thicker.  Either way, a delicious snack! :)  Good for movie theaters instead of salty high temp oil cooked popcorn!